バーチャル美少女定理証明士を支える技術
この記事とは特に関係ないのですがVTuber Techアドベントカレンダー(その1 その2)があるらしいので興味がある人は覗いてみるといいんじゃないでしょうか。
バーチャル引きこもり病弱定理証明士 夕暮寝子というのがいて、その子の裏側のシステムを作ったので(作ったのはだいぶ前)その解説をします。なお問題は山積みの模様(そもそも私以外の人が使う想定じゃないので自分でいじるなりなんなりしてください)。
技術スタック: Docker, Python, TypeScript, dlib (Python bindings), OpenCVちょこっと, Live2D SDK
💞はじめまして💞
— 夕暮寝子 (@YugureNeko) 2018年7月24日
🎊夕暮寝子といいます🎊
😴電脳空間で引きこもりをやっています😴
💻プログラムとか証明とかを書きます💻
💪Live2D動かすやつ作ってるのでそれができたらデビューします💪
👏よろしくお願いします👏#Vtuber準備中#Vtuber始めました#新人Vtuber#Vtuber pic.twitter.com/UAM9iTrFLU
リポジトリ
コードは全部公開しています。
https://github.com/myuon/juniQ
免責事項
このプログラム群はMITライセンスで公開しています(リポジトリにsubmoduleとして含まれるcubism-jsには当たり前ですがこのライセンスは適用されません)。
このソフトウェアはLive2D SDK for webを利用しており、ソースコードの公開及びブログにおけるコードの解説はLive2Dから許可を得て行っています。
このソフトウェアを利用して作られたものを出版(コードの一部または全部を公開することも含まれるようです)する場合にはLive2Dとの契約が必要になる場合があるのでその辺はちゃんと問い合わせてください。
Live2D SDKリリースライセンス: https://www.live2d.com/ja/products/releaselicense
(これ読む限りだとソースコードの一部を公開するだけでも出版にあたるかもみたいな書き方だったけど問い合わせたらソースコードの公開だけなら契約不要って言われたので割とLive2D側に判断の裁量がありそうです。まぁなんかやりたくなったらとりあえず聞いてみるのがよさそうな感じだった。)
アーキテクチャ
次のような仕組みで動きます
- ブラウザからカメラ映像を取得、websocketサーバーに画像を30fpsで投げる
- サーバーが画像を受け取って顔の検出等を行いパラメータを計算する
- 計算されたパラメータがブラウザのviewerに再度投げ返される
- viewerはLive2Dモデルを描画
なんでやねん
なんやねんこれと思うと思うんですがこれはホストPCがWindowsでありWindowsで開発はできないことと、VirtualBoxではUSBの映像出力等を直接受け取れない等の技術的制約により悲しくも厳しい設計になっています。
やーまじ全部Unityかなんかで作ればよかったーって後になって後悔したんですがしかしdlibとかのライブラリがUnityのアセットストアだとまともそうなやつはすごく高くていやいやみたいな気持ちになったりしたのはある。Unityネイティブプラグインで頑張って作り直したいけどつらそう。
あとクライアントからサーバーに直接映像を投げるのって意外と難しくて(browser to browserだとそれっぽい技術は意外とあるんだけど…)あんま選択肢がないし、そもそも検出とかの関係で絶対画像を切り出す必要があるのでまぁブラウザで切って送ればいいんじゃないかみたいになっておる。当然この処理は割と負荷かかるのでうんまぁみたいな感じ。
あとCORSの設定がこれを作ったときはよくわかってなかったのでFirefoxでしか多分動かないです。そのうちFirefoxでも動かなくなる可能性がある。
映像取得部分
映像と音声を取得する。getUserMediaとかを使うとできる。映像は30fpsくらいに落としてwebsocketサーバーにjpeg画像として投げつける。音声はリップシンクのために使う。
リップシンク作るところだけ載せます。
// https://github.com/myuon/juniQ/blob/master/viewer/src/index.ts#L42
class AudioVolume {
  processor: ScriptProcessorNode;
  volume: number;
  clipLevel: number;
  averaging: number;
  clipping: boolean;
  lastClip: number;
  clipLag: number;

  constructor(audioContext: AudioContext, clipLevel = 0.98, averaging = 0.95, clipLag = 750) {
    this.processor = audioContext.createScriptProcessor();
    this.processor.onaudioprocess = this.volumeAudioProcess;
    this.clipping = false;
    this.lastClip = 0;
    this.volume = 0;
    this.clipLevel = clipLevel;
    this.averaging = averaging;
    this.clipLag = clipLag;

    this.processor.connect(audioContext.destination);
  }

  // 音声がイベントとしてやってくるので音量を取得する
  volumeAudioProcess = (event: AudioProcessingEvent) => {
    let buf = event.inputBuffer.getChannelData(0);
    let sum = 0;

    // audio bufferから音量を合計
    buf.forEach((x) => {
      if (Math.abs(x) >= this.clipLevel) {
        this.clipping = true;
        this.lastClip = window.performance.now();
      }

      sum += x * x;
    });

    // 長さで割る
    let rms = Math.sqrt(sum / buf.length);

    // あまり急激に大きくならないように補正
    this.volume = Math.max(rms, this.volume * this.averaging / 2);
  };

  checkClipping = () => {
    if (!this.clipping) return false;

    if ((this.lastClip + this.clipLag) < window.performance.now()) {
      this.clipping = false;
    }

    return this.clipping;
  };

  shutdown = () => {
    this.processor.disconnect();
    this.processor.onaudioprocess = null;
  };
}
サーバーサイド(顔検出&計算)
次の処理を行う
- 顔検出(dlib)
- 口の輪郭とか目の輪郭とかのパーツの検出(dlib)
- パーツごとにパラメータの計算
- 体の左右傾き具合
- 顔の向きと回転角度
- 目の開き具合
- 目の中心位置(視線推定)
- 口の開き具合(なおオーディオリップシンク入れるのでこの機能は実質死んでる)
- 手の位置(肌色っぽい領域の中心位置を推定して手の位置を取ろうとした残骸があるけど肌色がありふれすぎてて精度があまりに悪いのでお蔵入り 多分緑色のテープとかを手にまくといい感じになると思う)
- カルマンフィルタで滑らかにする
顔検出
画像から顔の領域を切り出す。
# 顔の領域を検出するやつ
detector = dlib.get_frontal_face_detector()

# 顔の領域からパーツの輪郭を検出するやつ
# 機械学習ベースなので学習モデルが必要
# dlibが配ってるデータとかをもらってくる
predictor = dlib.shape_predictor(str(face_landmark_path))

# https://github.com/myuon/juniQ/blob/master/server/src/recognizer.py#L216
  if should_detect == 0:
    # 顔の領域をとってくる(リストで帰ってくる)
    face_rects = detector(frame, 0)
  should_detect = (should_detect + 1) % 3

  if len(face_rects) > 0:
    # 最初のやつ(そもそも1人しか映ることを想定してない)の領域を切ってくる
    face_rect = dlib.rectangle(
      int(face_rects[0].left() * (1 / resize[0])),
      int(face_rects[0].top() * (1 / resize[1])),
      int(face_rects[0].right() * (1 / resize[0])),
      int(face_rects[0].bottom() * (1 / resize[1])),
    )
detector(frame, 0)とかで顔の領域を切り出せる。簡単。
このdetectorの処理はかなり重いらしく、実際に他の処理に比べて時間がかかりがちなので毎フレームやるのはつらい。私は顔の領域自体は3フレームに1回だけ検出してる。predictorは重くないので毎回回して大丈夫。
パーツ検出
shape = predictor(original, face_rect)
だけでよい。簡単。
戻り値はパラメータが入ってくるがここの中断くらいにあるこの画像を参考にするとよい。
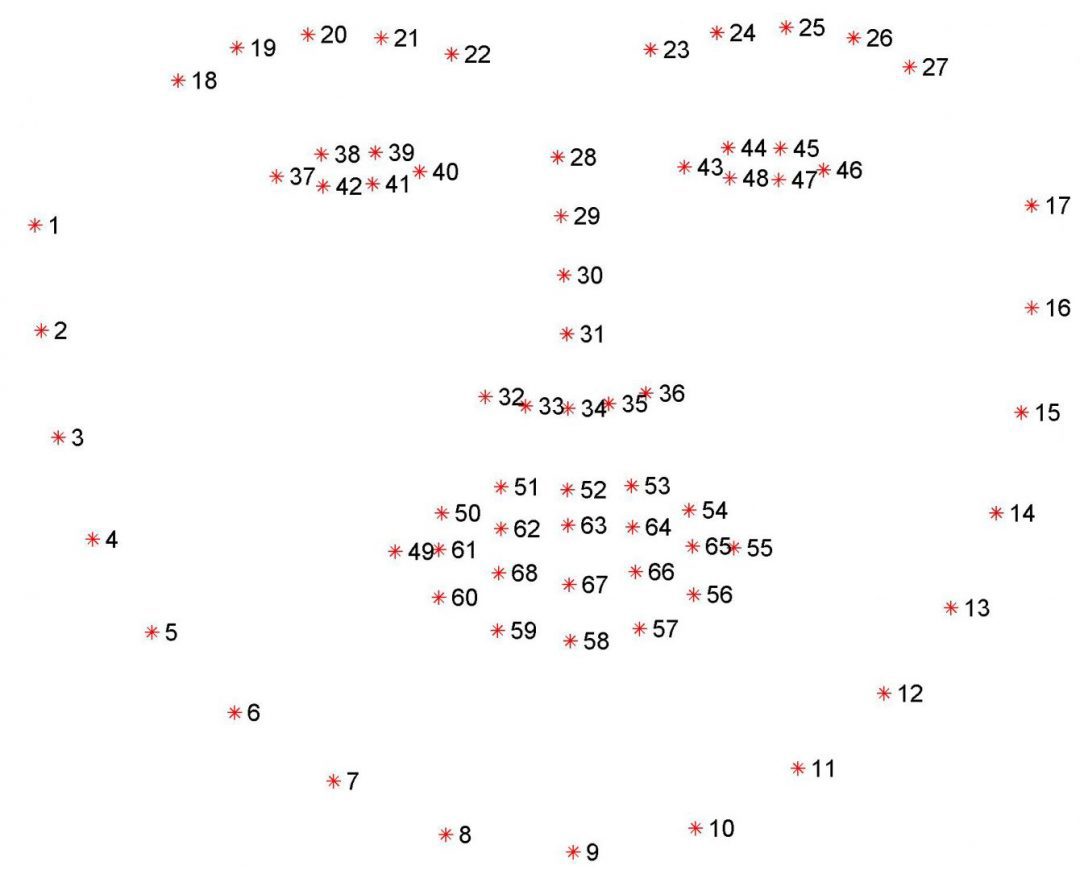
ちなみに以下のようになる。
# https://github.com/myuon/juniQ/blob/master/server/src/recognizer.py#L89
def create_parts_list(shape):
  return {
    # 顔の輪郭
    'chin': shape[0:17].tolist(),
    # 眉
    'left_eyebrow': shape[17:22].tolist(),
    'right_eyebrow': shape[22:27].tolist(),
    # 鼻(縦横)
    'nose_bridge': shape[27:31].tolist(),
    'nose_tip': shape[31:36].tolist(),
    # 目
    'right_eye': shape[36:42].tolist(),
    'left_eye': shape[42:48].tolist(),
    # 口
    'outer_lip': shape[48:60].tolist(),
    'inner_lip': shape[60:68].tolist(),
  }
顔の方向推定
顔の方向推定は割と難しいのだけど、大体次のような感じでやる。
- あらかじめ、顔のパーツの3D座標を調べておく(目の中心とか輪郭の中心とか)
- 顔のパーツの座標から対応する2D座標を持ってくる
- solvePnPで解く(2Dと3Dの対応点から回転ベクトルを求めたりするやつ; OpenCVにある)
# https://github.com/myuon/juniQ/blob/master/server/src/recognizer.py#L9
K = [6.5308391993466671e+002, 0.0, 3.1950000000000000e+002,
     0.0, 6.5308391993466671e+002, 2.3950000000000000e+002,
     0.0, 0.0, 1.0]
D = [7.0834633684407095e-002, 6.9140193737175351e-002, 0.0, 0.0, -1.3073460323689292e+000]

cam_matrix = np.array(K).reshape(3, 3).astype(np.float32)
dist_coeffs = np.array(D).reshape(5, 1).astype(np.float32)

# 顔の3D座標とかそういうやつ
# どこかからもらってきたやつと職人による手作業でチューニングされてる
object_pts = np.float32([
  [6.825897, 6.760612, 4.402142], # 17
  [1.330353, 7.122144, 6.903745], # 21
  [-1.330353, 7.122144, 6.903745], # 22
  [-6.825897, 6.760612, 4.402142], # 26
  [5.311432, 5.485328, 3.987654], # 36
  [1.789930, 5.393625, 4.413414], # 39
  [-1.789930, 5.393625, 4.413414], # 42
  [-5.311432, 5.485328, 3.987654], # 45
  [2.005628, 1.409845, 6.165652], # 31
  [-2.005628, 1.409845, 6.165652], # 35
  [2.774015, -2.080775, 5.048531], # 48
  [-2.774015, -2.080775, 5.048531], # 54
  [0.000000, -3.116408, 6.097667], # 57
  [0.000000, -7.415691, 4.070434] # 8
  ])

reproject_src = np.float32([
  [10.0, 10.0, 10.0],
  [10.0, 10.0, -10.0],
  [10.0, -10.0, -10.0],
  [10.0, -10.0, 10.0],
  [-10.0, 10.0, 10.0],
  [-10.0, 10.0, -10.0],
  [-10.0, -10.0, -10.0],
  [-10.0, -10.0, 10.0]])

# https://github.com/myuon/juniQ/blob/master/server/src/recognizer.py#L89
def decompose(shape):
  image_pts = np.float32([
    shape[17],
    shape[21],
    shape[22],
    shape[26],
    shape[36],
    shape[39],
    shape[42],
    shape[45],
    shape[31],
    shape[35],
    shape[48],
    shape[54],
    shape[57],
    shape[8],
  ])

  _, rotation_vec, translation_vec = cv2.solvePnP(object_pts, image_pts, cam_matrix, dist_coeffs)
  reproject_dst, _ = cv2.projectPoints(reproject_src, rotation_vec, translation_vec, cam_matrix, dist_coeffs)
  reproject_dst = reproject_dst.reshape(8,2).tolist()
  rotation_mat, _ = cv2.Rodrigues(rotation_vec)

  return reproject_dst, rotation_mat, rotation_vec, translation_vec
詳しくはOpenCVのsolvePnPとかで調べると良いと思う。
これで回転行列とかが得られるので、顔の回転角度は次で計算する(ちなみにここで得られた行列は「カメラ」基準なことに注意。顔の行列は別に計算が必要)。
# https://github.com/myuon/juniQ/blob/master/server/src/recognizer.py#L78
def get_head_pose_angles(rotation_mat, rotation_vec, translation_vec):
  new_rotation_mat = -np.matrix(rotation_mat).T * np.matrix(translation_vec)

  rotation_vec = np.array([
    new_rotation_mat[0],
    new_rotation_mat[1],
    rotation_vec[2] * 180 / np.pi,
  ])

  return rotation_vec.squeeze().tolist()
目の開き具合
目の開き具合は目の縦幅とかから適当に計算してる(値がハードコードされてるけどカメラ画像のサイズとかに依存するのでアレ 本当はキャリブレーションしないとだめなんだけどそれもしてない)
目は基本的にあまり閉じさせない方がよくて、今のやり方だと半目になることがすごく多いのでこれはどうにかした方がいい。基本はずっと開きっぱなしでたまに閉じるくらいがいいと思うんだけど、どうするのがいいんだろ。瞬きを観測したら瞬きアニメーションを発火とかするとよさそうだけどめんどい
# https://github.com/myuon/juniQ/blob/master/server/src/recognizer.py#L102
def eye_open_param(eye):
  h1 = np.linalg.norm(np.subtract(eye[1], eye[5]))
  h2 = np.linalg.norm(np.subtract(eye[2], eye[4]))
  h = (h1 + h2) / 2

  return (
    0.0 if h < 3.0 else
    1.0 if h > 8.0 else
    (h - 3) / 5
  )
目の中心推定(目線推定)
目の領域が分かっているので二値化して瞳の中心を推定する。
# https://github.com/myuon/juniQ/blob/master/server/src/recognizer.py#L113
def get_center(gray_img):
  # OpenCV2のmomentsとかいうのを使うと円を推定して中心を計算してくれるらしい
  moments = cv2.moments(gray_img, False)
  try:
    return int(moments['m10'] / moments['m00']), int(moments['m01'] / moments['m00'])
  except:
    return None

def detect_eye_center(img, shape):
  # 右目、左目の領域をアレしておく
  left_eye = [
    shape[36],
    min(shape[37], shape[38], key=lambda x: x[1]),
    max(shape[40], shape[41], key=lambda x: x[1]),
    shape[39],
  ]
  right_eye = [
    shape[42],
    min(shape[43], shape[44], key=lambda x: x[1]),
    max(shape[46], shape[47], key=lambda x: x[1]),
    shape[45],
  ]

  def get_eye_center(eye):
    origin = (eye[0][0], eye[1][1])
    if abs(eye[2][1] - origin[1]) < 2:
      return None

    # 画像から目の領域を切り出す
    eye = img[origin[1]:eye[2][1], origin[0]:eye[-1][0]]
    # 二値化
    _, eye = cv2.threshold(eye, 30, 255, cv2.THRESH_BINARY_INV)

    center = get_center(eye)
    if center:
      return int(center[0] + origin[0]), int(center[1] + origin[1])

    return center

  def normalize_position(value, start, end):
    size = abs(end - start)
    return (value - (start + size / 2)) / (size / 2)

  # 中心座標を計算
  left_pos = get_eye_center(left_eye)
  right_pos = get_eye_center(right_eye)

  # 正規化(0.0から1.0の間の値にmappingする)
  if left_pos is None:
    left_normalized_pos = None
  else:
    left_normalized_pos = (
      normalize_position(
        left_pos[0],
        min(shape[37][0], shape[41][0]),
        max(shape[38][0], shape[40][0])
      ),
      normalize_position(
        left_pos[1],
        min(shape[37][1], shape[38][1]),
        min(shape[40][1], shape[41][1])
      )
    )

  return (
    (left_pos, right_pos),
    left_normalized_pos
  )
口の開き具合の推定
目と同じように適当にやる(雑)
体の傾き推定
ウィンドウ中心と顔の中心から傾きを適当に推定する。なくてもよいけど若干Live2Dの体の軸で傾斜つけるとそれっぽくなるのでいれてる。
# https://github.com/myuon/juniQ/blob/master/server/src/recognizer.py#L205
def get_body_pose(rect):
  # center_of_window = (160,120)
  center_of_face = (rect.left() + rect.width() / 2, rect.top() + rect.height() / 2)
  return 90 - (np.arctan2(480 - center_of_face[1], center_of_face[0] - 360)) * 180 / np.pi
カルマンフィルタ
カルマンフィルタを入れると何もかもぬるぬるになる。これがないと結構がくがくになるので入れた方がいい。
カルマンフィルタは前の値と次の値から推定値を出すためのものなので前の値も残しておく必要があることに注意。
# https://github.com/myuon/juniQ/blob/master/server/src/main.py#L19
class KalmanCache():
    def __init__(self, keys=[]):
        self.filters = {}
        self.prevs = {}
        self.vels = {}

        for key in keys:
            self.create(key)

    # カルマンフィルタの定義
    # 若干秘伝のたれ入りかも
    @staticmethod
    def newKalmanFilter():
        kalman = cv2.KalmanFilter(3,3)
        kalman.measurementMatrix = np.array([
            [1,1,1],
            [0,0,0],
            [0,0,0]
        ], np.float32)
        kalman.transitionMatrix = np.array([
            [1,0.1,0],
            [0,1,0.5],
            [0,0,1]
        ], np.float32)
        kalman.processNoiseCov = np.array([
            [1,0,0],
            [0,1,0],
            [0,0,1]
        ], np.float32) * 0.1

        return kalman

    def create(self, key):
        self.filters[key] = self.newKalmanFilter()
        self.prevs[key] = 0.0
        self.vels[key] = 0.0

    # 新しい値を突っ込む
    def correct(self, key, value):
        vel = value - self.prevs[key]
        self.filters[key].correct(np.array([
            value,
            vel,
            vel - self.vels[key]
        ], np.float32))

        self.prevs[key] = value
        self.vels[key] = vel

    # 次の値を推定
    def predict(self, key):
        return float(self.filters[key].predict()[0])
Viewer (live2Dモデル描画)
Live2Dモデルは事前に作っておきます。
モーションとかをちゃんと設定しておくのと、パーツの描画優先度はきっちり順番にしておくのが大事っぽい。あとパーツは日本語じゃなくてアルファベットの方が都合がいいと思います。
後なんか今のシステムだと物理演算(髪とかの)がちゃんと動いてないっぽいんだけど理由がよくわからない。なんでだろう。
// https://github.com/myuon/juniQ/blob/master/viewer/src/viewer.ts#L53

class App {
    app: PIXI.Application;
    model: LIVE2DCUBISMPIXI.Model;
    position: [number, number];
    scaler: [number, number];
    size: [number, number];
    empty_animation: LIVE2DCUBISMFRAMEWORK.Animation;

    ...
}

let app = new App({
    size: [1024, 720],
    moc: "assets/yugure_neko_avatar/yugure_neko_export.moc3",
    texture: "assets/yugure_neko_avatar/yugure_neko_export.2048/texture_00.png",
    physics: "assets/yugure_neko_avatar/yugure_neko_export.physics3.json",
    empty_motion: "assets/empty_motion.json",
    position: [512, 720],
    scaler: [1.5, 1.5],
});
アプリケーション本体はAppクラスで記述します。モデルの読み込みとか設定とかをします。
パスはハードコードなんやすまんなという気持ち(気持ちのみ)。
以下はconstructorの中身です。(この辺はSDK for webのexampleとか見たら大体分かると思う)
// https://github.com/myuon/juniQ/blob/master/viewer/src/viewer.ts#L72
                this.app = new PIXI.Application(this.size[0], this.size[1], { backgroundColor: 0x00ff00 });
                document.body.appendChild(this.app.view);

                let moc = LIVE2DCUBISMCORE.Moc.fromArrayBuffer(resources['moc'].data);

                this.model = new LIVE2DCUBISMPIXI.ModelBuilder()
                    .setMoc(moc)
                    .setTimeScale(1)
                    // テクスチャ
                    .addTexture(0, resources['texture'].texture)
                    // 物理演算の設定
                    .setPhysics3Json(resources['physics'].data)
                    // これはなんで要るんだっけ…(トオイメ)
                    .addAnimatorLayer("base", LIVE2DCUBISMFRAMEWORK.BuiltinAnimationBlenders.OVERRIDE, 1)
                    .build();

                this.processModel(); // モデルをちょっといじる(後述)

                this.app.stage.addChild(this.model);
                this.app.stage.addChild(this.model.masks);

                // この辺でアニメーションレイヤーの初期化を行います。
                // アニメーションは実際にパラメータを投げられたら設定して動かすみたいになるので
                // ここでは空にしておきます
                this.empty_animation = LIVE2DCUBISMFRAMEWORK.Animation.fromMotion3Json(resources['empty_motion'].data);
                this.empty_animation.evaluate = (time: any, weight: any, blend: any, target: any) => {
                };
                this.model.animator.getLayer('base').play(this.empty_animation);

                this.app.ticker.add((deltaTime) => {
                    this.model.update(deltaTime);
                    this.model.masks.update(this.app.renderer);
                });

                this.setStageTransform();
                this.onResize();
                this.sendToParent();
processModelというのがマスクとモデルレイヤーの処理を行います。これをしとかないとうまく画面に表示されない(表示順とか表示領域がおかしくなるっぽい)
// https://github.com/myuon/juniQ/blob/master/viewer/src/viewer.ts#L126
    processModel = () => {
        // レイヤーを表示順に沿って並べ替える
        // 勝手には並べてくれないのでこれをしないと表示順が変になる
        let orders: [string, number][] = [];
        for (let k in this.model.drawables.ids) {
            orders.push([this.model.drawables.ids[k], this.model.drawables.renderOrders[k]]);
        }
        orders.sort((x:[string, number], y: [string, number]) => x[1] - y[1]);

        // メッシュを新たに追加みたいなことをする
        // ここは完全に謎だけどこれをしないと目の表示とか上手くいかなかった
        // 謎が深い
        this.model.removeChildren();
        for (let [mesh_name, _] of orders) {
            let mesh = this.model.getModelMeshById(mesh_name);
            this.model.addChild(mesh);
        }
    };
実際にアニメーションとかをするのは次の処理。animateByParamsを呼ぶとアニメーションが始まる。これを1秒に何回も呼ぶことで滑らかなアニメーションになるけど、一方でめっちゃ重くなる(当たり前や)のでもっと工夫した方がいい説ある。
// https://github.com/myuon/juniQ/blob/master/viewer/src/viewer.ts#L173
    animateByParams = (params: {[key:string]: string}) => {
        if (this.empty_animation === undefined || this.empty_animation === null) return;

        // さっき初期化しておいたempty_animationを使う
        // evaluateに関数をセットしてplayすると動く
        this.empty_animation.evaluate = (time: any, weight: any, blend: any, target: any) => {
            // ここではparamsに動かしたいパラメータが入ってる
            Object.keys(params).forEach((key) => {
                let parameter_name = target.parameters.ids.indexOf(key);
                // アニメーションはblendを使っていい感じの値を作ることで実現する
                // まぁ適当でもなんとかなってる(ほんまか?)
                target.parameters.values[parameter_name] = blend(target.parameters.values[parameter_name], parseFloat(params[key]), 0, weight);
            });
        };
        this.model.animator.getLayer('base').play(this.empty_animation);
    };
後はまぁマウスホイールやクリックでモデルを拡大縮小したり動かしたりスライダーでパラメータ設定したりする機能があるけどどうでもいいので飛ばす。
このシステムについて
色々と問題があり値がハードコードされてたりソースコードがめっちゃ汚かったりdockerの使い方おかしかったり(ていうかビルドの仕組みちゃんとアレしたい)キャリブレーションがなかったりするので使うときはその辺をどうにかした方がいいと思います。
まぁでも一応動いていてそれっぽくはなるので遊びたい人はどうぞ。
あと結構重いのでずっと動かしっぱにするとCPUなどによくない可能性がある。軽量化もしたいんだけどなー。
Unityで作り直そうとずっと思っているんですがネイティブプラグインの作り方とかそれがどれくらいしんどいことなのかとかが皆目見当もつかないので悩んでるという感じです。
まーとにかく、Live2D SDKもOpenCVもdlibも使うの初めてで顔検出とかさっぱりわからぬという状態だったんだけどとりあえず動くものができたのはよかったかなと思います。
最後に
夕暮寝子ちゃんをよろしくお願いします(って言ってもなんもコンテンツがないんだけど)
あと公開に対して許可をくれたLive2Dの方ありがとうございました。